Pages

Wednesday, November 30, 2011

Scrap Jar Stars

I'm easily distracted...  so what? :)


I did get my banners done though.  And I'm almost done with the binding on that customer's quilt.  And, I'm going to work on the store quilt when I get back from my trip...And, I did clean my shower, my bathtub, my laundry room, my pantry, and folded lots of laundry over the last few days. justification.

But I really didn't need to start a new quilt.  I have about a hundred others in the works.  But, I was just fightin' that feelin' for so long!!!  There's something about starting a new quilt.  The planning, the choosing, the testing...

Do you hear what I'm saying???

Tuesday, November 29, 2011

Tuesday Tips {The Quilted Fish}

Welcome to Tuesday Tips!

I am so excited today because the ever so talented, Amanda Herring (otherwise known as The Quilted Fish) is here to give us the scoop on her creative space!  Amanda is a friend of mine, who I first met through Alpine Quilt Retreats.  She's been an inspiration, an encourager and kind of a mentor to me for the last year or so.  She's a fabric designer (for Riley Blake Designs), pattern designer, crafter of all sorts.  She's funny.  She's creative. 
She's a one-hundred-and-ten-percent-kind-of-gal. 
Get your "pins" ready because I know you're going to love this.

♥ ♥ ♥

Hello!  I am Amanda from The Quilted Fish.  I am so excited to be here to share a little bit of my studio with you.  Amber is so amazing that she does all of this and gathers lovely bits from different people, don't you think?
So when Amber asked me to share some of my organizational techniques, I nearly choked on my drink.  Let me make one thing clear.  I am a lot of things, but organized is NOT one of them.  In fact, I had to clean my studio to take pictures!  I like to make messes.  It is part of who I am.  I do not, however, enjoy cleaning up after myself!  It was a good thing that she had other options for me to share!  So I am going to share almost everything (not my cutting table because that is where everything is piled that I didn't want in the pictures).  

I can't wait to show you around!

My sweet hubby (Mr. Fish) built me these beautiful shelves.  There are six shelves and they are all bursting with my favorite things.  I collect bottles and jars, antique scales, antique sewing machines, vintage trims and buttons and of course FABRIC! 

IMG_2772

One of my favorite storage things I have is this metal chest that I bought at Hobby Lobby (aka the mother ship).  Each drawer has something special in it......
  IMG_2774

I love this little spot in my studio.  It is where I write patterns and work on my laptop when I have it in there.  We made this "pin board" from a window we had in one of my market booths.  It has chicken wire in it and I use clothespins to hang all kinds of treasures and special ribbon.

  IMG_2775

  IMG_2777

IMG_2778

Then there is my actual sewing space.  I don't sit here as much as I would like to!!!

IMG_2786

But when I do sit there, I often have company.  So I had to have a nice place for people to sit....

IMG_2781

If I don't have every tool I own strewn all over the studio, they are here in these pretty little urns.

IMG_2784

And I like to keep the selvages from my fabrics, so I use them as a necklace for this poor fellow...

IMG_2783

Which on closer inspection is likely a woman.  Boy do I feel bad.  I thought it was a he!

So there it is.  Most of the studio, minus the mess!!  I hope you have found something fun that you could use in your studio.  Thanks to Amber for having me!

♥ ♥ ♥

What a great room, eh?
Thank you SO much, Amanda, for sharing those pictures with us.  You gave us lots of great ideas on how to decorate/organize our creative spaces!  I LOVE how you draped your selvages over the bust and all of your shelving is making me drool!  You've got it organized so pretty!

I'm having so much fun spying on all of these creative spaces.  Aren't you???Leave us a comment and let us know what you think of this Tuesday Tips!

Monday, November 28, 2011

2 Hours to Kill

There's a lot to do before I go to my hometown, Vancouver, WA. on Thursday.
Cleaning, laundry, organizing.
I'm leaving the kids and hubby to go hang with my sisters.
The parents will stay one night until my hubby gets home from a business trip.
Gotta make sure things are in order :)

But I'm dying to get in some sewing time
before the kids get home from school today.

Project #1: six more burlap banners for Christmas neighbor gifts:


Project #2: hand sewing a binding on a quilt for a customer.

Project #3: work on this new quilt for the store
Pot o' Flowers from the book
Sugar Sack Quilts by Glenna Hailey.

(I work at a fabric store 2 days a week. This quilt will be mine in a few months after they're finished displaying it.)

I'm loving the checkerboard sashing.  These squares are tiny though.  They finish at 1"!  Agh!!!  I'm excited to be working with 30's prints.  I haven't worked with them much before, but the ones I picked out sure are happy and sweet. 

Do you do 30's?

Well, I gotta get busy!  Have a good one!

Tuesday, November 22, 2011

Tuesday Tips {Twin Fibers}

Welcome to Tuesday Tips!

We have another inspiring creative space brought to us today by Jessica of the blog, Twin Fibers!  I found Twin Fibers a few months ago while cruising around Blogland one day and have loved the quilty goodness I've seen there since.  Especially this 3 Pears Pillow (check it out!)  Jessica is a twin (as you may have guessed).  She shares the blog with sister, Jennifer, which means it's twice the fun over there!  So without further adieu, here's Jessica ~

Good Morning!
I wanted to say thanks to Amber for inviting me to be a part of her Tuesday Tips. I have to admit, I'm a new reader to her blog and I'm so happy to have found A Little Bit Biased!

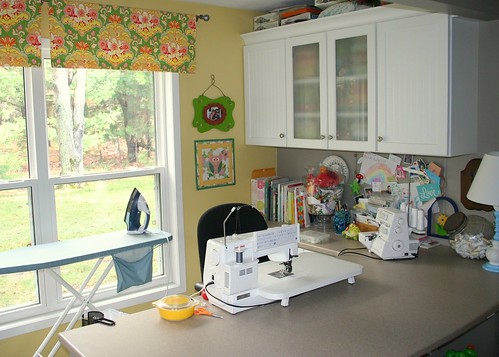
I thought I'd take some time today and show you around my little sewing area. My husband helped me build in this area of our basement so that I could have a dedicated area to sew and quilt. It has been so nice to be able to leave a project out and not have it messed up (like it frequently was when I was sewing at the kitchen table). :)

my sewing area - to the right

My space over looks the play area in the basement. I've got a row of cabinets to hold fabric... most of my stash is in the center cabinet with the frosted glass doors. I keep my serger and sewing machine set up and ready to go.
I find it really helpful to have the ironing board right behind my chair. That way I can just turn around and press a seam quickly.

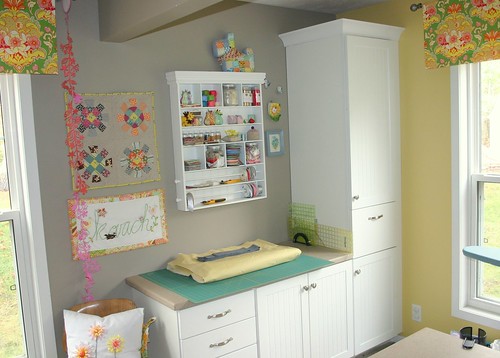
my sewing area - to the left

Here's a view to the left. This is where I have my rotary cutting mat and rulers.
The white shelf holds all sorts of ribbons, Perle cotton, glitter, pincushions and a few little decorative items that are special to me. I also set my rotary cutter up on the shelf... I've had problems with little hands getting a hold of scissors and cutting fabric before, so I've learned to keep them up high and out of reach!

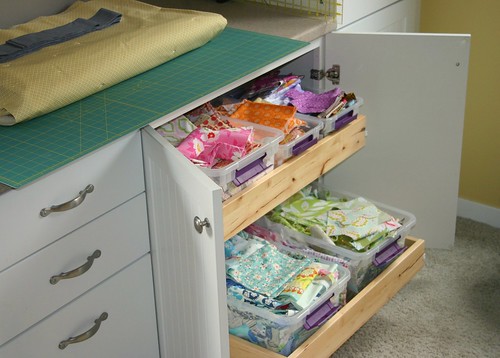
scrap storage

My work area is usually pretty clean. I find that when I'm organized and there's not a huge mess... then I can focus on a project and finish it up. Now, for the rest of the playroom... there's toys all over... but at least I have an area that's cleaned up! ;)  The picture above is of my scrap fabric storage. I think it's about time for a scrap quilt!

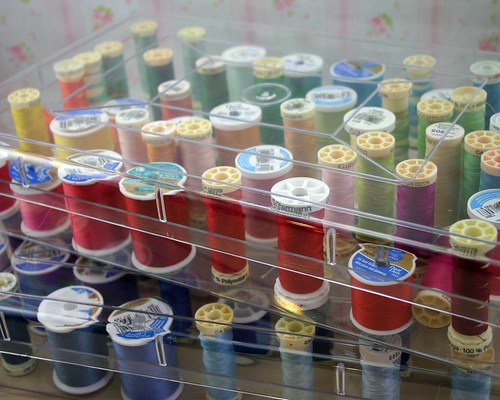
thread storage

And here's how I store all my thread. I have a couple of clear storage boxes where the spools are sorted by color order.

I hope you've enjoyed seeing a little bit of how I organize and store things! Please visit with me at twin fibers if you'd like to see what I've been sewing.
~Jessica

Jessica, thanks so much for coming today!  I love your set up (so clean and organized and pretty!)  I need to move my ironing board closer to me and get me some of those clear containers for thread!  Just perfect!!!

Please feel free to leave Jessica a comment below.
I hope you enjoyed this installment of Tuesday Tips and have a great day!

Monday, November 21, 2011

Can I be random for a minute?

I thought I'd share a little bit of what's been going on behind the scenes around here.  This will probably be a long post and I apologize.

I feel like I need to start off with explaining that I've been in a pretty big "funk" since Spring Quilt Market.  Now don't get me wrong, Market was a great experience.  I am so happy that I got to see what it was all about, meet some really amazing people and prove to myself that I could do it. I couldn't have done it without my amazing father who constructed my booth, some really supportive friends and a dear Sister-In-Law.  But, it was a super stressful time for me.  It was hard to juggle all of my market responsibilities with my wife and mother responsibilities.  I was stressing BIG TIME about the heavy walls we had to construct for my booth and I worried a lot since I had never been before and didn't quite know what to expect.  I had to rely a lot on the help of others (especially my dad) and that was hard for me.  Basically, I was a big old mess.


Market was good though.  People seemed to enjoy my booth and patterns and that felt good.  But all in all, it was a rather slow event.  I was lucky to come out a head.  So when it was all said and done, I felt a little deflated.  I definitely needed a break.  Over the last few months I've felt really unmotivated, overwhelmed, moody and frankly I think I've just been a little depressed.  Not because of Market but maybe that kind of triggered it.  I was just going through a phase.  Do you know what I mean?

I'm feeling A LOT better now and I think two things helped.  First, after talking to my husband one day, I kind of realized that this new {slower} pace was a normal pace.  I'm one of those people who is a "doer" and I find satisfaction in marking tangible projects off my list.  It's helped me to realize that taking time to smell the roses is necessary and good.  Right after I had that epiphany I was talking to a family member about everything.  We had both been experiencing our own kind of "funks" and we both had been impressed recently to do more personal scripture study.  Earlier this year I made a goal to have more faith, hope and to study the scriptures more.  I had some ups and downs in the first two departments but the personal scripture study was pretty much a big fat zero.  So after talking to my sister in law, I made a vow to make time each day to read the Book of Mormon.  The Book of Mormon is another testament of Jesus Christ and confirms the truths found in the Bible.
.


I have felt so good connecting with God on a more regular basis.  I feel better.  Things are going more smoothly.  Things are more manageable.  I know that is what was missing from my life.  I am receiving the spiritual, mental and emotional strength I needed by reading the scriptures.  I am happier.

A few more random things...
We've been keeping busy with indoor soccer games.  My son and I are both on teams.  Can I tell you what a big joke that is since I've never played a day in my life {until a few weeks ago}.  It was quite the anxiety-ridden experience at first, but I am beginning to enjoy it :)  Who says you can't learn a new sport at the age of 33?  Remind me to tell you about when they asked me to be goalie at my first game...

I've been sewing up some items for my sister's booth at the world's largest Christmas bazaar {starting next week) in Portland, OR.


I know she's going to do great.  She's got a great support system and I'm so proud of her for doing it!

I'm almost finished with a new Fall table runner.  Nothing like last minute, right?  Well, a few months ago, I won 8 Fall-ish fat quarters at my quilt guild.  I couldn't figure out what to do with them.  I had been itching to make another rendition of my Square Root pattern so I decided to kill two birds with one stone  and use them to make a table runner.  I still have to quilt it.  But I used up every last inch of those fat quarters by using them to make a scrappy back too.


I also attended a funeral this weekend.  It was for a friend named Jacqueline Hill.  A young mother {about my age}.  She had a bad accident about 5 years ago that resulted in her being a quadriplegic.  She is the mother of six.  She was beautiful and wild and she will be greatly missed.  I am thankful I had a few hours with her a couple of weeks ago so we could go to lunch {just the two of us}.  We also had a quick blogging session together about a week before she past away.  She was a great example of someone who loved life, her husband, motherhood and never judged.  During this season of thanksgiving, I hope we can all take the time to be more grateful for the little things. 
And the big things. 

~ Amber

Tuesday, November 15, 2011

Tuesday Tips {Our Cozy Nest}

I'm so happy to have Nicole here from the cute blog:


I've been following Nicole's blog for a long time now.  It's full of fabulous crafty, quilty ideas and she's always baking things up over at the
Moda Bakeshop, as well!   Check out some of Nicole's clever ideas that keep her efficient and her sewing room organized.

***

I'm very excited to be posting at A Little Bit Biased.  Amber is one of those blogging friends that I would just love to meet in "real life" so I was super excited when she asked me to guest post.  

I've been needing to organize my fabric for a very long time.  So when I came across this old Pottery Barn shelf at my friends garage sale,  I knew it would be perfect.  I knocked out a couple of divider pieces of wood on the bottom so I would have room for some bigger pieces of fabric and then spray painted it,
oh - how I LOVE spray paint.


I'm super excited with how it turned out.    It fits my pre-cuts  perfectly.  Now I just need to get some more fabric to fill it up!  :)


Another thing I've been needing to do for a long time was get a sewing desk.  The ones I've seen can cost a couple hundred of dollars and I just didn't have it.  This desk was on sale at target for around $80.   My dad cut the top out for me so that my sewing machine would fit perfectly.    The front folds down, so I can change the bobbin thread.  It works great!!!


I've been trying to learn free motion quilting, so having a bigger level space to works on helps a ton! 

***

That table is genius and way to re-purpose that shelf for your needs, Nicole. 
It's perfect and so cute!  Thanks for sharing those ideas!

Please feel free to leave Nicole some comment love :) below
and I hope you'll all come back next week for another installment of
Tuesday Tips!

Monday, November 14, 2011

Apple Crumb Pie

Is it bad to have apple pie for breakfast?


Because I did.

This Martha Stewart Apple Crumb Pie.

Minus the raisins (ew).

It was delicious.

(Thanks mom and dad for the bucket of apples :)

Hope you all have a great day!

P.S.  Come back tomorrow for another Tuesday Tips.

Sunday, November 13, 2011

Holly Berry Table Topper Tutorial

In case some of you didn't get a chance to stop by the Quilt Story blog last week, I thought I would post the tutorial for my Holly Berry Table Topper here, as well.  In my opinion, there is nothing better than a handmade gift for the holidays and this little project is perfect for those who want to make a quick project on a budget!
Finished size: 20" x 26"


Here's what you'll need:
(20) 2-1/2" x 4" scraps of assorted green fabrics
(15) 1-1/2" squares of assorted red fabrics for berries
1/3 yd. beige fabric for background
1/4 yd. red fabric for sashing
6 yds. green 5/8" wide ric rac
3/8 yd. red fabric for bias binding
2/3 yd. backing
3/8 yd. light weight fusible web (17" wide) such as Heat n Bond
batting, 24" x 30"

Let's get started!

First you will need to trace the leaf template (20 times) and a U.S. nickle (15 times) onto the paper side of fusible web.  The leaf should measure 1 3/4" x 3 1/2" and the circle should measure 7/8" in diameter. 

Click HERE for the leaf template.  Right click on the image.  Copy and then paste the image into a word document. You may need to enlarge the image a little.  I can't seem to upload the file without it changing the size so you may have to adjust that on your own computer.

Roughly cut out each shape.  Iron (paper side up) to the wrong side of the appropriate colored fabric scraps.  Cut out each shape on the traced line (leaving the paper on at this point).


Next, from your beige colored fabric, cut three 3-1/2" x width of fabric strips.  Sub cut these strips into five 3-1/2" x 20" strips. 

Fold one strip in half and press with a warm iron to mark the center.  Then fold in each end to the center point and press again.  Peel of the paper back of three berries.  Center one berry on each fold mark (the edge of each berry should be 1-1/4" away from the edge of the beige strip).  Press with a warm iron to adhere.


Peel off the paper back of four leaves and center on either side of each berry (edge of leaf should be 3/4" away from the edge of beige strip).  Press with a warm iron to adhere.


Repeat this process for the other four strips of leaves and berries.

Once all of the leaves and berries are adhered, machine applique around each one using a small zig zag stitch and coordinating thread.


* I marked each of my strips with a number so I could keep them in order :) 


Set leaf/berry strips aside. 

From your red fabric, cut three 2-1/2" x width of fabric strips.  Sub cut these into six 2-1/2" x 20" strips.  You will also need to cut ten 21" strips of ric rac.


Sew one piece of ric rac to either side of each red strip of fabric (using an 1/8" seam allowance).  The ric rac tends to fray so don't trim it until right before quilting.


Sew the strips together using a 1/4" seam allowance.  Alternate colors, beginning and ending with the red.  **Don't mind this picture, it was taken before all the leaves and berries were adhered and before the ric rac was sewn on - but it shows you the layout of the strips :)


Quilt as desired and bind with 2-1/4" bias strips.  You can check out my "Sweet Bias Binding Tutorial" on my blog for some tips!


I hope you enjoyed this project and tutorial but if you're still itchin' for some more red and green quilty goodness, check out my new Pretty Peppermints quilt pattern HERE. 


Happy Holidays to everyone
(and may there be lots of handmade goodies coming your way! :)
~ Amber

Tuesday, November 8, 2011

Tuesday Tips {from Pleasant Home}

I'm so excited to be hosting my first {ever} guest blogger today!  Jodi Nelson, from the blog Pleasant Home is here to share a little part of her creative space as part of my new Tuesday Tips series.  I'm on an organizing "kick" right now.  I can't wait to pick up some new tips and ideas from other bloggers and designers through this series.  I hope you'll like it too.  Now over to you, Jodi!


Hi Everyone!

It's me Jodi from Pleasant Home!
new Blog Fall header
And can I first say... I {heart} Amber's blog and check in often for oodles and oodles of inspiration...
I was thrilled when Amber announced she'd be doing a Tuesday Tips series on her blog. And equally thrilled to be the guest post today!


Amber asked me to share a couple pics from my 'Creating Space' and tell you a little about them. So here we go.... Here is one of my most favorite parts of my 'Creating Space'...


My Work Table. My hubby built and put it together for me. It was inspired by a work station I saw in a Pottery Barn catalog. It was a great design idea and I see it out in blog land often now.

Cutting Table

I have two Target cubbies on each end with a large plywood top. It gives me plenty of room for a Cutting Board on one side and an Ironing Board on the other. And it's just the right height for me.

The Ironing Board

On one end of the work table I keep my scraps. I {LOVE} sewing with scraps! Having them organized by color in my cute little wire bins, really helps! Anything less than a fat quarter goes into these bins. {pssst... i clean them out regularly Give them Away! and sell scrap bags in my Etsy Shop}

Fabric Scraps

I don't know how I'd function without this work table. I truly feel blessed to not only have a hubby who can help me with projects like this... But also a room in my home that I can call my own. Thanks Amber for inviting me to share a bit of my space with your readers!


You can see more pics of my 'Creating Space' and more details, on Flickr HERE....

Thanks so much for sharing that with us, Jodi!  That table is cool!  I think we're all going to be bugging our husbands to make us one now :)  I hope you'll all come back again next week for more Tuesday Tips.  Nicole from Our Cozy Nest will be here sharing some tips from her creative space.

Have a great day!  ~ Amber

Monday, November 7, 2011

Holiday Gift Tutorial from me to you!

Heather and Megan {from Quilt Story} are hosting a Holiday Gift Tutorial series on their blog right now.  Fun little projects will be posted every Monday through December.  These girls are super fun {and so is their blog}!  I met them at Market and we've gotten to know each other a bit from sewing nights, fabric launch parties and blogging!

So guess what fun little table topper tutorial is posting today?!?


My Holly Berry Table Topper.  A quick project that's perfect for using up scraps {yay}.   I hope you'll stop by.

P.S.  Come back here tomorrow for a post by my first ever guest blogger, the super talented Jodi Nelson from Pleasant Home!  She'll be sharing some Tuesday Tips from her creative space with us!  

Be sure to pick up this Tuesday Tips button for your blog :) 


the link

So stay tuned.  It's gonna be fun :)

Friday, November 4, 2011

Mod Medallions - Daydream

Before Spring Quilt Market 2011, I made a new version of one of my first patterns ~ Mod Medallions.  After Market it was whisked off to the Riley Blake warehouse so I never got to share any pictures with you!  Well, she's back now so I thought I'd share.


I enjoyed remaking Mod Medallions (which is rare because I usually hate making the same quilt more than once!)  But I LOVED the fabrics and I loved making these cute little medallions all over again.  I had actually gotten a lot better at ironing over those edges compared to the first go-around :)


The fabric line is called Daydream by Stitch Studios for Riley Blake Designs.


Kinda sweet huh?


Binding and backing:


These medallions are perfect for showcasing some fun custom quilting!


For the next week you can enjoy free shipping if you order this pattern from my shop.  Just enter the coupon code: MODMEDALLIONSRB.

I hope you all have a great weekend! 
I'm hoping to get some sewing time in on a new design I've been toying with.  What about you???

Tuesday, November 1, 2011

Tuesday Tips - A New Series

Did you all have sweet dreams last night?  I know I did.  I skipped dinner and ate about 8 fun size candy bars (AND DIDN'T FEEL THE LEAST BIT BAD ABOUT IT.)  It's the only night a year that we can justify that right?

So do you remember about 6 weeks ago when I posted pictures (HERE) of my disastrous sewing room???  Well, talk about a good kick in the pants.  Since then, I've really been motivated to get my sewing room in working order.  If you follow me on Pinterest, you know I've been collecting pictures of different ways to organize and decorate my sewing room.  I've been so inspired by all of the wonderful ideas on Pinterest lately that I've just about finished a complete sewing room makeover and have decided to start a new series on my blog called, Tuesday Tips.  I'll be sharing some ideas that I've implemented into my new creative space that are sure to keep things cute, organized and efficient.  The best thing about Tuesday Tips is that I've asked other well-known bloggers and designers to share bits of their creative spaces with you too ~ right here on my blog!

So today, I want to be the first to share one little corner of my creative space.  Let me first tell you though, that during my makeover, I found inspiration from two places.  First, my color scheme was inspired by a piece of Moda fabric that I picked up about 6 months ago and second, my "statement piece" was inspired by this picture I found on Pinterest:

   [image found on weheartit.com]  Isn't she dreamy???

So first, I painted my walls "Peppermint Patty" by Ace Hardware.  Then I went on a hunt for a double wide dresser.  I was on a mission.  I had one hour to shop before my kids got home from school.  I first hit a couple of stores where they sell cute (painted) furniture with lots of character, but quickly realized that they would want about $300 dollars more than I had to spend.  So I cruised around the corner to a local thrift store instead.  There, I found it. 


She was a total piece of junk.  Some little kid really did a number on her. 


She was missing a piece of hardware


 and part of a leg.


It was nothing that a little sanding, wood glue and a few new knobs couldn't fix though.


This ugly duckling went from drab to fab for less than $50!


Here's the breakdown: 
$45 - dresser
$16 - four glass knobs
$30 - paint and rollers
$96 - total for new storage unit


I desperately needed some style and function in this room.  Now, there's a place for everything and everything in it's place!  Notice my inspiration fabric in my rose framed message board (I got the frame from the Good Will for $9.99!  I'm all about the deals baby!) 


So this is just one aspect of my new sewing room.  I love the form and function this piece offers.  I can beautifully display my scraps and threads on top, while storing away more fabric and tools inside.  This was definitely a much needed piece of furniture in this room!

I'll share some more photos from my sewing room makeover with you in the following weeks, but I do hope you'll come back next week for "Tuesday Tips" where Jodi from the blog, Pleasant Home will share with us a little piece of her creative space!  I can't wait to see it!!!